凹逗工程師

成為一個更好的人

0%

『 資料結構 』鏈結串列 Linked-List

前言

這週要帶各位認識的資料結構是「 鏈結串列 Linked-List 」,一開始所學的陣列(串列)是一種非常簡易能讓我們存放資料序列的資料結構,而鏈結串列則是一種動態的,我們進行新增或刪減元素,就會依照需求進行擴充。陣列應該是大家最常用的資料結構,每種語言都支持它,但是卻有一個隱憂:在大多數的語言中,陣列的大小是固定的,從起點或中間插入、移除元素是非常耗成本的。

鏈結串列(Linked-List)

鏈結串列存放著有序的資料,但與陣列不同的是,其中的元素在記憶體中並不是連續放置的,每個元素是由一個節點和一個指向下一個元素的鏈結組成。

鏈結串列

優劣之處

優點顯而易見,在我們新增元素或刪除時並不需要去移動其他的元素,只需要注意將鏈結重新調整就好。
上帝開了一扇窗給你,就會關你一扇門。
你還記得陣列可以隨意存取任何位置的任何元素嗎?而鏈結串列只能從起點也就是 head 開始迭代下去。如果你在考慮要使用陣列還是鏈結串列時,不妨可以針對你的需求來做出較佳的選擇。

現實中的實例

  • 尋寶遊戲
    依照線索一道一道往下解謎。
    尋寶
  • 火車
    由一節一節的車廂連結而成,很容易將其分開。
    火車

建立鏈結串列

瞭解 Linked-List 後,我們就要用程式來實作啦。

1
2
3
4
5
6
7
8
9
10
11
12
13
14
15
16
17
18
19
20
21
22
23
24
25
26
27
28
29
30
31
32
33
34
35
36
37
38
39
40
41
42
43
44
45
46
47
48
49
50
51
52
53
54
55
56
57
58
59
60
61
62
63
64
65
66
67
68
69
70
71
72
73
74
75
76
77
78
79
80
81
82
83
84
85
86
87
88
89
90
91
92
93
94
95
96
97
98
99
100
101
102
103
104
105
106
107
108
109
110
111
112
113
114
115
116
117
118
119
120
121
122
123
124
125
126
function LinkedList(){
let Node = function(element){
this.element = element;
this.next = null;
}

let length = 0;
let head = null;

// 向串列尾部添加一個新元素
this.append = function(element){
let node = new Node(element),
current;

if(head === null){
head = node;
} else {
current = head;

// 串列迴圈,直到找到最後一個
while(current.next){
current = current.next;
}

// 找到最後一項,將其 next 指向 node ,建立鏈結
current.next = node;
}

length++; // 更新串列長度
};

// 向串列的特定位置插入一個新元素
this.insert = function(position, element){
// 檢查越界值
if(position >= 0 && position <= length){
let node = new Node(element),
previous,
index = 0;

if(position === 0){
node.next = current;
head = node;
} else {
while(index++ < position){
previous = current;
current = current.next;
}
node.next = current;
previous = node;
}
length++;
return true;
} else {
return false;
}
};

// 從特定位置移除一項
this.removeAt = function(position){
// 檢查越界值
if(position > -1 && position < length){
let current = head,
previous,
index = 0;

// 移除第一項
if(position === 0){
head = current.next;
} else {
while(index++ < position){
previous = current;
current = current.next;
}

// 將 previous 與 current 的下一項鏈結起來:跳過 current ,進而移除它 previous.next = current.next;
}
length--;
return current.element;
} else {
return null;
}
};

// 從串列中移除一項
this.remove = function(element){
let index = this.indexOf(element);
return this.removeAt(index);
};

// 返回元素在串列中的索引。如果串列中沒有該元素則返回 -1
this.indexOf = function(element){
let current = head,
index = 0;
while(current){
if(element === current.element){
return index;
}
index++;
current = current.next;
}
return -1;
};

// 鏈結串列中不含任何元素,返回 true。
this.isEmpty = function(){
return length === 0;
};

// 返回鏈結串列包含的元素個數。
this.size = function(){
return length;
};

// 由於使用了 Node 類別,就需要覆寫繼承自 Js 物件預設的方法,讓其只輸出元素的值
this.toString = function(){
let current = head,
string = '';
while(current){
string += current.element;
current = current.next;
}
return string;
};

this.print = function(){};
}

Linked-List 還需要一個 Node 類別來輔助,表示要加入串列的項目。它包含一個值 (element) ,和 指向串列中下一個節點的指位器 next 屬性。另一個重點是,我們還要一個用來存放第一個節點的引用(head)。

方法詳述

相關的程式碼都在上方,這邊就不再多打一次了,我們直接說明邏輯的部份!

添加:在鏈結串列尾部追加元素

append(element),這邊有兩種情況,一是串列為空;二是不為空。

  • 向空串列添加一個元素

如果 head 的值為 null,就意味著在向串列添加第一個元素,所以要做的是將 head 指向 node 元素。而 node.next == null。

  • 向一個不為空的串列尾部添加元素

首先,要先找到最後一個元素。
⚠️ 要注意的是我們只知道第一個元素,因此需要迴圈存取串列,直到找出最後一個。
為此我們要一個變數是指向串列中 current 項目,當 current.next 為 null 時,就知道我們到達串列尾端了。接下來要做的就是讓當前(也就是最後一個)元素的 next 指位器指向想要添加的串列節點上。

移除:從鏈結串列中移除元素

removeAt(position),該方法要得到移除元素的位置,就需要先驗證這個位置是有效的。從 0 到串列長度都是有效位置。如果不是有效,就 return null(意即沒從串列移除元素)。

兩種情況:一是移除第一個元素;二是移除第一個以外的任意元素。

  • 從串列中移除第一個元素

要做的是讓 head 指向串列第二個元素。我們將用 current 變數建立一個對串列中第一個元素引用。將 head 賦為 current.next,就完成了。

  • 從串列中移除中間元素

需要依靠一個細節迭代串列,直到到達目標位置(使用一個用於內部控制和遞增的 index 變數):current 變數總是為對串列迴圈的當前元素的引用;他被命名為 previous。

因此,要從串列中移除當前元素,要做的就是將 previous.next 和 current.next 鏈結起來。這樣當前元素就會被丟棄在電腦記憶體中,等著被垃圾回收桶清除。

  • 從串列中移除最後一個元素

當我們跳出迴圈,current 是對串列中最後一個元素(要移除的項目),current.next 為 null(因為他是最後一元素)。由於還保留著 previous 元素引用,要做的就是把 previous.next 的值改成 current.next。

插入:在串列任意位置插入一個元素

insert(position, element),由於要處理到位置,就必須在一開始檢查臨界值,如果越界了就 return false,表示沒有完成添加。

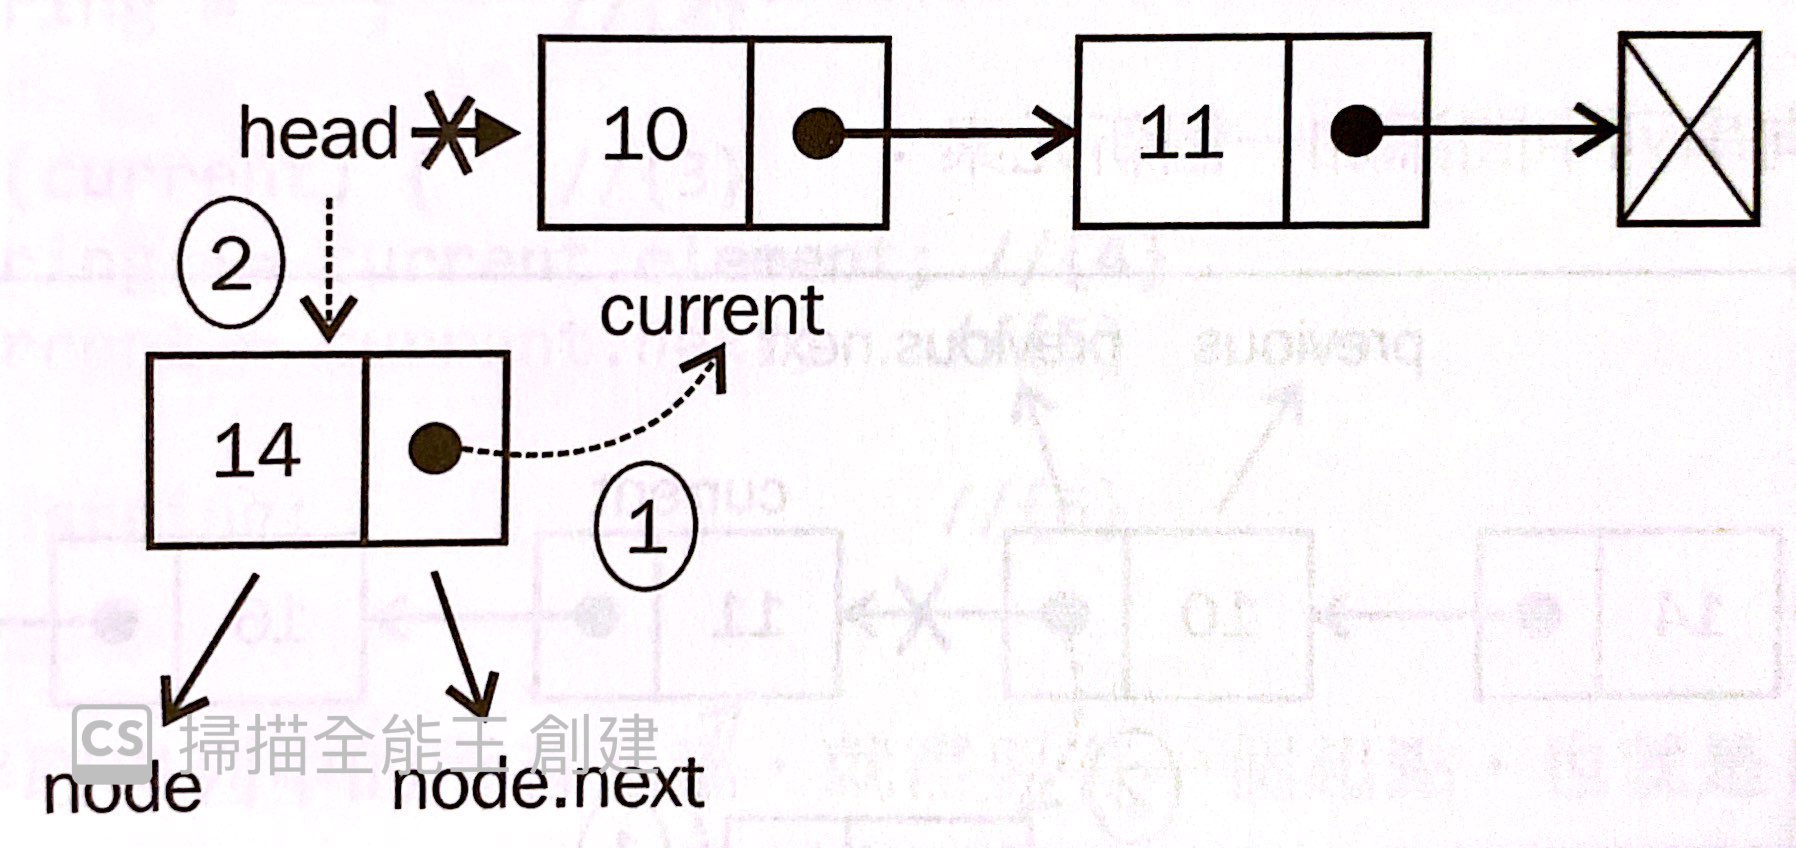
  • 在串列起點添加一個元素

current 是對串列第一個數的引用。我們要做的是把 node.next 的值設成 current。現在 head 和 node.next 都指向 current。接著就是將 head 改成 node,這樣串列就多一個元素了。

  • 在串列尾部添加元素

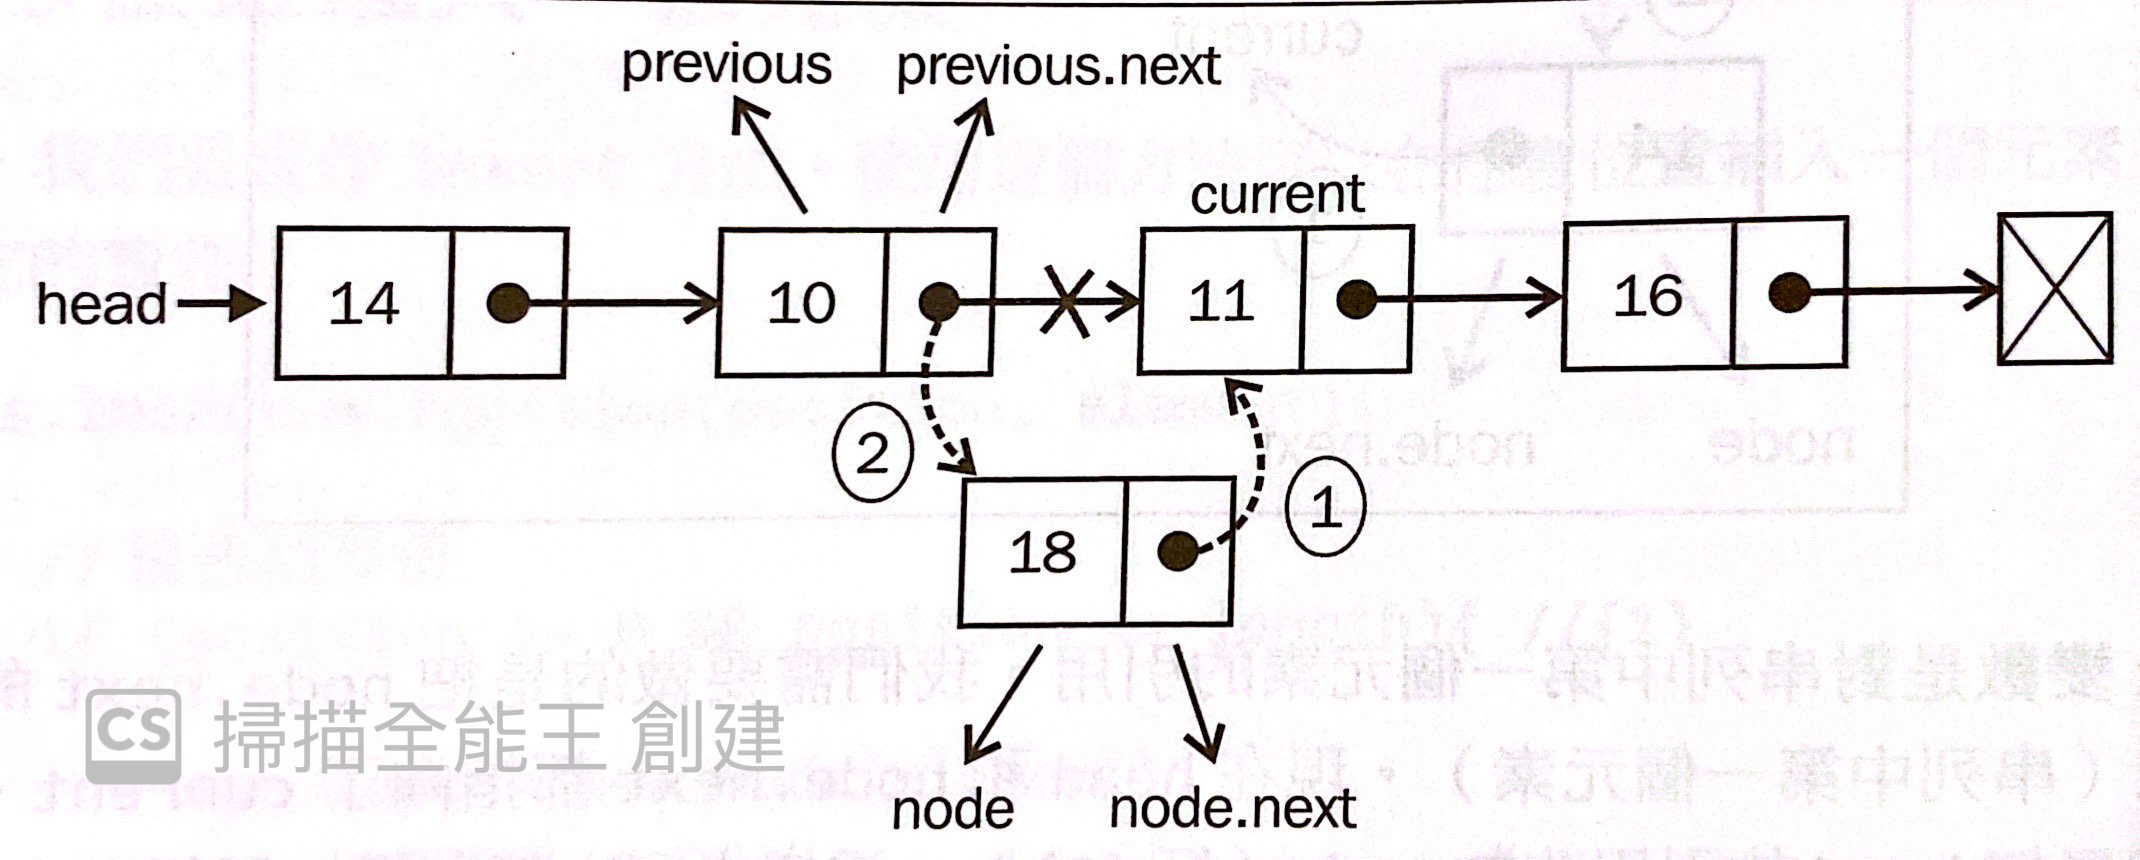
首先,需要用迴圈存取串列,找到目標的 position。當跳出迴圈時,就是 current 到達我們想要插入新元素位置的後一個元素,而 previuos 是對想要插入新元素的位置之前一個元素的引用。在這情況下,我們要在 current, previous 之間添加,因此,首先要把新項目(node)和當前項目鏈結起來,然後再改變 previous 和 current 之間的鏈結,我們還要將 previous.next 指向 node。
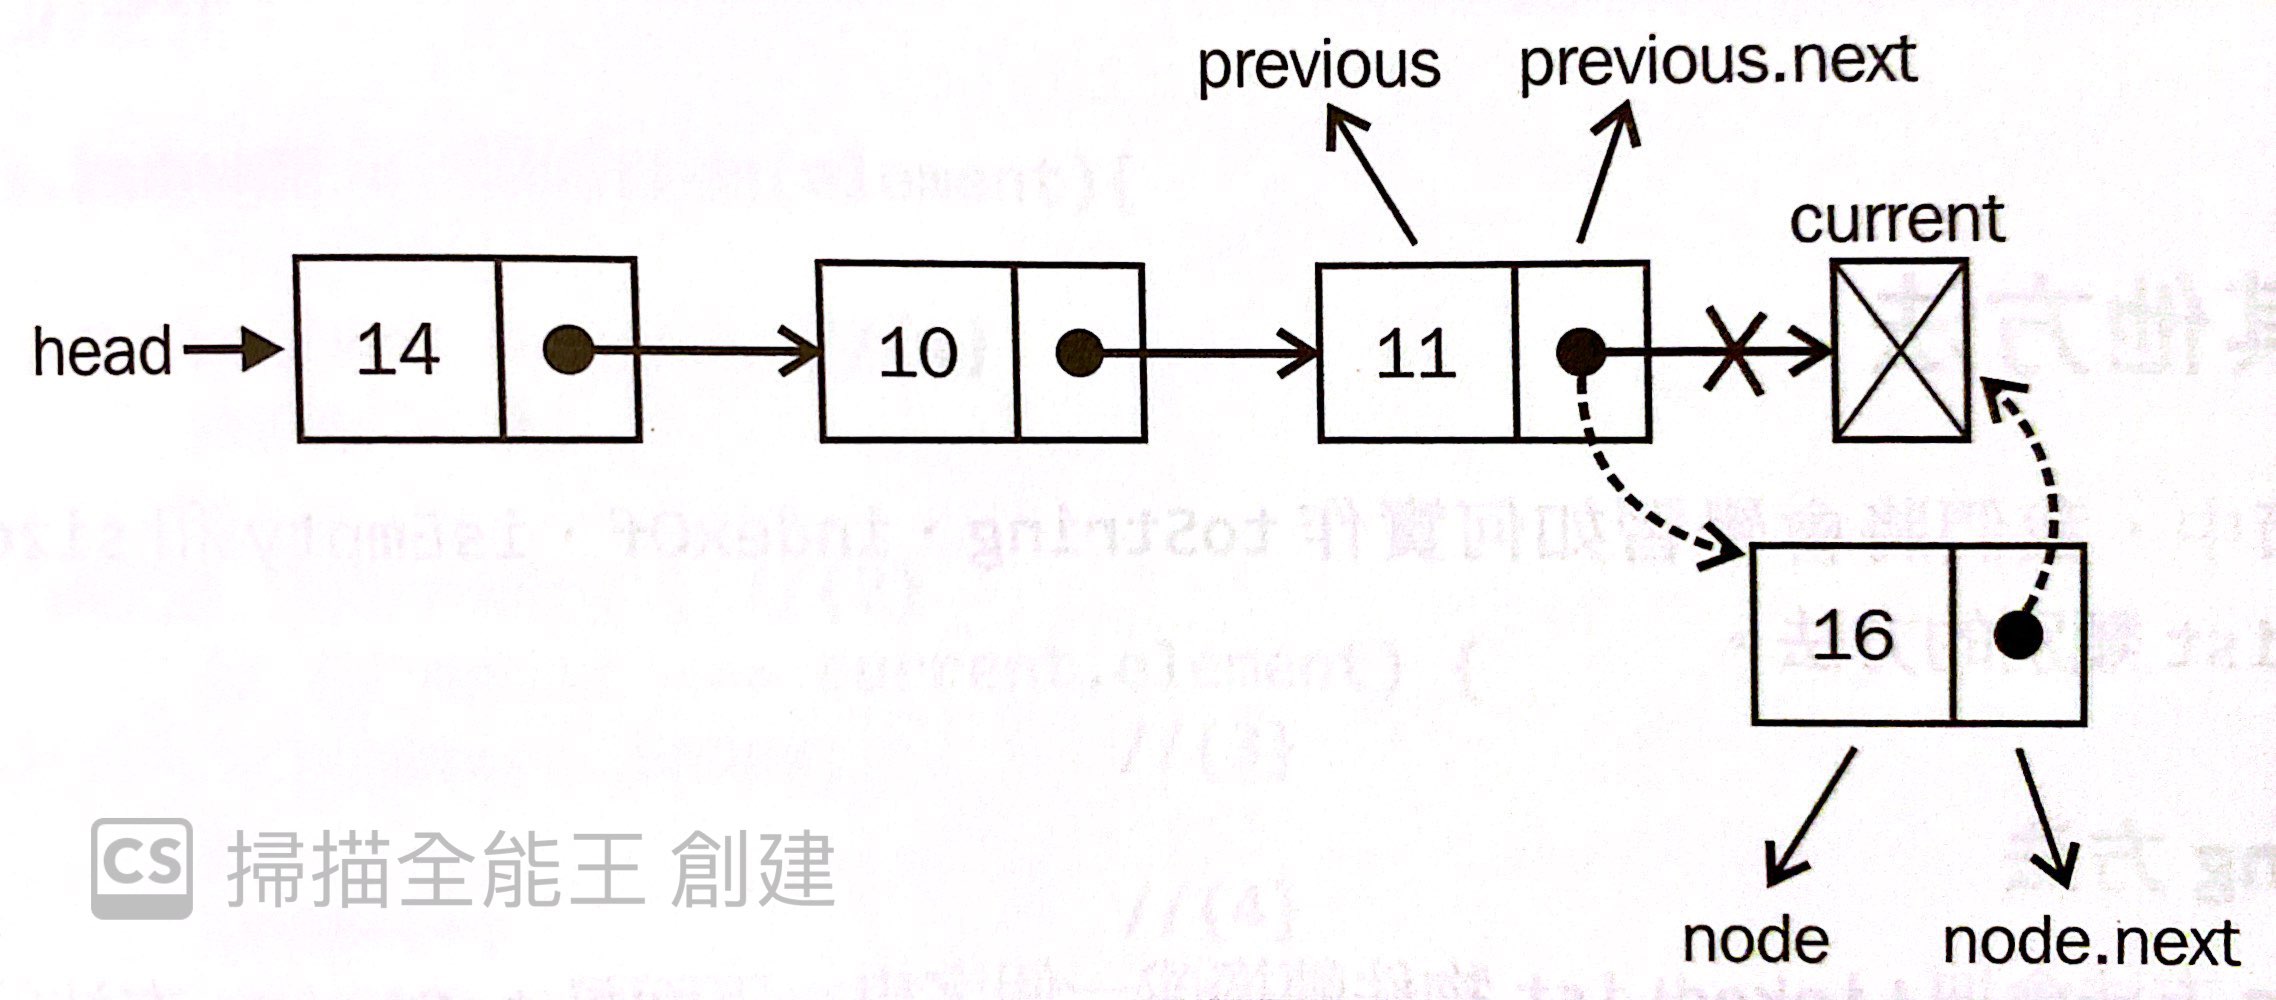
如果我們試圖向最後一位添加新項目,previous 將會是串列最後一個,而 current 將會是 null。在這情況,node.next 將指向 current,而 previous.next 指向 node。

  • 在串列中間添加元素

試著將 node 插入到 prev, curr 之間。首先,我們要把 node.next 指向 curr。然後把 prev.next 的值設為 node,這樣就完成囉。

雙向鏈結串列 (Double Linked List)

相較原型,雙向鏈結的串列 node 多了一個 prev,而 list 也多了一個 tail。
我們可想而知,多了向前的鏈結,讓我們可以解開單向迭代的枷鎖,不只可以從頭到尾,也可以反過來。

1
2
3
4
5
6
7
8
9
10
11
12
13
function DoublyLinkedList(){
let Node = function(element){
this.element = element;
this.next = null;
this.prev = null; // 雙向串列才有
}

let length = 0;
let head = null;
let tail = null; // 雙向串列才有

// methods
}

在任意位置添加新元素

和單向的鏈結串列的區別在於,雙向鏈結串列需要同時控制 next, prev 兩個指位器。

1
2
3
4
5
6
7
8
9
10
11
12
13
14
15
16
17
18
19
20
21
22
23
24
25
26
27
28
29
30
31
32
33
34
35
36
37
38
39
40
41
42
this.insert = function(element, position) {
// 檢查是否越界
if (position >= 0 && position <= length) {
let node = new Node(element),
current = head,
previous,
index = 0;

// 項目添加在第一個位置
if (position === 0) {
// 空串列
if (!head) { // new
head = node;
tail = node;
} else {
node.next = current;
current.prev = node; // new
head = node;
}
} else if (position === length){ // 添加在最後一項 // new
current = tail;
current.next = node;
node.prev = current;
tail = node;
} else {
while (index++ < position) {
previous = current;
current = current.next;
}
node.next = current;
previous.next = node;

current.prev = node; // new
node.prev = previous; // new
}
length++;

return true;
} else {
return false;
}
};

環狀鏈結串列

環狀鏈結串列可以單向也可以雙向。和鏈結串列不同的是,最後尾端指向的不是 null,而是第一個元素 (head)。

我們今天學到了鏈結串列這個結構,和陣列相比最重要的優點就是無需移動鏈結串列中的元素,就能輕輕鬆鬆添加或移除元素。
當你需要添加和移除很多元素時,最好的選擇非鏈結串列(Linked-List)莫屬!

歡迎關注我的其它發布渠道